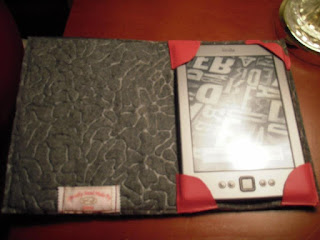
FINALLY!! Finished with Frank's birthday gift.Never mind that Frank's birthday was back in April! ( actually finished this in June or July) I wanted to make him something that he would really love. This has taken longer than it was supposed to because I've been totally focused on my schoolwork. Sewing has, unfortunately, taken a back seat to my degree. Hopefully I'll be done in another year though!!
I hate when it takes me a long time to finish something.
Any hooo... I took the leather and measured it against the kindle case and multiplied it by 2. I then picked out a design to put on the front. I hand tooled the leather in the shape of a tree. It took a LONG time to do. After I finished that. I measured the foam on the kindle. I wanted to make sure that it would be safe in it's case. I made him pick out a button to sew to the front. After I put my name tag and the leather corners to hold the kindle in the case. That was fun to figure out...I just eyeballed it and sewed it down. It worked somehow. After that I rubber cemented the foam to the leather on the inside, then I rubber cemented the finished lining to it. ( measured it accordingly of course) I sewed the outside to make it stronger and hold everything together in case the rubber cement fails. I just need to attach the elastic band to hold it together and I'm done!!
He loves it. Here is how it turned out.
I etched this on the front from a picture that Frank loves. I haven't got the strap on to hold it closed, but he doesn't seem to mind. Not to mention that he won't give it back to me so I can add it. I'm planning on making myself a green or yellow one soon-ish. I will post that as well. If you have any questions let me know. I'd be happy to answer them. Plus I saved a lot of money making my own. And hey, isn't that what DIY is all about anyways??
What began as just sewing has now morphed into a Homesteading and self-sufficient blog outlet. Moving to a new state, starting our homestead and trying to do what we can to keep ourselves healthy and saving money. "Use it up, Wear it out or Do without." Is the motto here. I look forward to growing and learning. Come along with me!
18 November 2012
13 November 2012
Harley Quinn Original costume
First I found this pattern Kwik sew 3052
 |
| Kwik sew 3052 |
I made a circle for the white part to go over top the suit, and then cut out the half circles. My boyfriend wanted to help with this so he measured me and then drew on the fabric and cut it out and it was perfect. He just divided my circle by 5 so there would be the right amount of "petals". I will take a picture of how this is done next time. I need to make a new one anyways, because someone spilled orange pop on mine and it stained.
.JPG) I had to carefully cut out the sections and cut the pattern in half to make it half black and half red.
I had to carefully cut out the sections and cut the pattern in half to make it half black and half red.
Which I was really excited about!!
I sadly no longer have this sewing machine, it was a good one for many years. sewing the middle together was difficiult with the seams streching and going all over the place. once this is set you add the zipper, I put it on the front but you could put it on the back to I suppose. Having it on the front makes it easier to put on and take off myself.
And here is a picture of me in the final jumpsuit.
I had fun making this and I am going to be working on some more Harley Quinn clothes soon.
Subscribe to:
Comments (Atom)


.JPG)


