31 August 2013

Pattern and Fabric Selection Cotton Sew Along Part 1


I've decided to try and make something for fall for myself. I'm a little stressed out and I think that making something non-wedding might help to calm me down. Plus, who doesn't love cotton?? And vintage dresses?? You KNOW I'm in on that one. So I've committed to this sew along, now to pick out a pattern to sew. The sew along states vintage as 20s-70s. That suites me just fine as I'm a 30s-50s kind of vintage girl. So on to looking at my fabric. At first I wanted to do the red dress with the black trim, then found out that I did not have enough of the red. Booo. Maybe later I'll go to the store. (after I whittle down my current fabric stash)

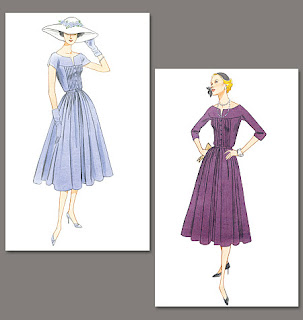
These are the patterns that I picked out initially. The one on the top left I would  have made but I found I did not have enough of the fabric that I wanted to use.

These are my initial fabric choices. I was trying to match two of them together to do the pattern in the top left of this picture. I have a big tote full of patterns. so I had a lot of choices.

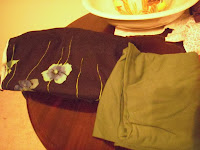


I decided to go with this plum one here.


These are the two patterns that I've narrowed it down to thinking about using. Unfortunately most of my fabric that would work for this is mostly remnants of pieces that were from other sewing projects and I need  2.5 yards for the one on the left and 6 for the one on the right. I think that the dress on the right needs a little more stiffness to it so I may hold off on making that one for now. I do want to make it, but I'm not finding anything in my stash to make it with...unless I cut up a sheet (again). Which I thought about, I rummaged through the linen closet and did not find anything that I wanted to give up sleeping on yet. So, looks like we have a winner by default. Don't get me wrong I love them both, I just love how I chose one over the other based on not having to go to the store again.
I can't wait to get started on this project. Sept 1st starts the sew along. (Which is tomorrow!!)
I've decided on the purple-plum jersey cotton. It should drape well, yet take the gathering in the seams without looking too bunched up. It looks better in person than in my photos.

This comes from Rochelle's blog which you can see here.
So, are you going to join too? What do you think of my selections?


25 August 2013

Making a Spring dress

OK, I'll admit that I've had this dress done for a very long time.(Spring time) I have not had time to post it because I have been in school. I am very close to being done. I am looking to graduate in May of 2014. So Fall and Spring and I'm out! Then we are getting married in June 2014! I'm still working on planning for that one and I'm very excited to actually BE married now. I also learned that I don't like party planning.  But, let's get back to what you are here to see, right? Spring dress-2013.
I used a Vintage Vogue pattern.
 I really loved this look in the yellow, but sometimes yellow doesn't look too good on me so I went with green. Here is a picture of the fabric and my Grayson. He was trying to help me out. Isn't he a cutie?
I digressed with a little cuteness, but on to the dress.
I made a muslin for the top, because I wasn't sure where I needed to adjust it. I always like to make a muslin, unless I'm making something super simple. Especially on tops, because I have a lot of fitting issues there. So here is me in my muslin. 
I think it looks pretty good. But I did a few adjustments in the back because it was a little gaped.  One more picture and then I cut out the pattern and get to sewing.
I was being a little silly here, because

Well...I'm just silly. On to the cutting. This pattern is fairly straightforward. I had to adjust the shoulders and the darts a little because I am a bit larger up top than the standard sizes allow.

Here is Grayson and me cutting the fabric. Yeah, everything is covered in cat hair by the time I finish, but it is washable and I love him too much to kick him out. Although when making my wedding dress, he is not allowed in the room. More on that later though. 


I would recommend this to beginners, even if you don't make the muslin *screaming inwardly* for your self. I love to make the muslin though. You can get out all of your mistakes and learn how to make the pattern correctly here. If you do it while you are sewing with your good fabric it may cost you more money later. If you are using cheap fabric though, go for it. I do that sometimes myself. 

Now for the final pictures of me in the dress. 
Grayson was there the whole way through so I thought I should take a final picture with him.    Outside was a little bright, so I took some more inside photos. I hope you enjoyed my version of this 1930's dress. That button has daisies on it also to keep with the flower theme. I am eventually going to make the belt in the same mustar-y gold color. But I like it without it too. Now to find some shoes that will look good with it. Maybe I'll just make my own?




In this picture to the right  you can see how I used the darts to make the bodice fit my body shape better. 
This is why I say to make a muslin. 
Thoughts or questions? I'd love to know what you think. 


21 May 2013

Renaissance Costumes Part 1

I have been working on McCall's 4696 for a little while.
 I made view A, and I am contemplating adding the sleeves from view C at a later time and maybe making B as well. I used a cornflower Blue linen and I made it reversible instead of using a lining with it. I used a slightly stretchy black velvet looking fabric (It's been in my stash so long I have no idea what it really is!) And I put canvas in the middle to give it some strength and rigidity. Instead of metal eyelets/grommets I hand sewed the eyelets on in the black thread. Yes, this is a tedious process.(WHY DID i CHOOSE TO DO IT THIS WAY?? IT IS TAKING SO LONG!!)  I really didn't like the look of the metal eyelets and I have a tough time getting them to stay on  the way that I want to. I tried one and then ended up prying it out. I think I've gotten pretty good at hand sewing them and I can do them at a rate of  5 eyelets per hour. That being said. I loved this pattern.
I made a skirt in matching fabric from the McCalls 4090.

 I made view C without the trim in the middle. I didn't really like that in the middle. This was really easy to make and pretty straightforward. I hand sewed the eyelets in the back of this skirt as well. Hemming this huge circle skirt was the worst part, but it wasn't too bad really once you get started.
I want to make the skirt in View D in one color and McCalls 4994 View A (without the arm bands/sleeves) for next time.


I always have so many plans of what I want to make, but with school and work I just dream about it. As soon as school is over I'm going to concentrate on my sewing and my violin playing. Both have suffered greatly as of late.

Maybe I can post some pictures/videos of me playing the violin since this is my artistic venue blog. :)

I am planning on going to some renaissance faires this year again.
Who wants to go this year?

18 November 2012

FINALLY FINISHED! Kindle case.

FINALLY!! Finished with Frank's birthday gift.Never mind that Frank's birthday was back in April! ( actually finished this in June or July) I wanted to make him something that he would really love. This has taken longer than it was supposed to because I've been totally focused on my schoolwork. Sewing has, unfortunately, taken a back seat to my degree. Hopefully I'll be done in another year though!!
I hate when it takes me a long time to finish something.
Any hooo... I took the leather and measured it against the kindle case and multiplied it by 2. I then picked out a design to put on the front. I hand tooled the leather in the shape of a tree. It took a LONG time to do. After I finished that. I measured the foam on the kindle. I wanted to make sure that it would be safe in it's case. I made him pick out a button to sew to the front. After I put my name tag and the leather corners to hold the kindle in the case. That was fun to figure out...I just eyeballed it and sewed it down. It worked somehow. After that I rubber cemented the foam to the leather on the inside, then I rubber cemented the finished lining to it. ( measured it accordingly of course) I sewed the outside to make it stronger and hold everything together in case the rubber cement fails. I just need to attach the elastic band to hold it together and I'm done!!

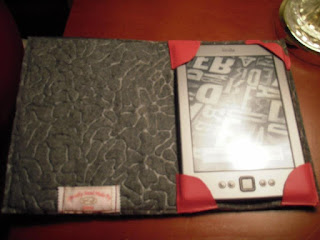
He loves it. Here is how it turned out.


 I etched this on the front from a picture that Frank loves. I haven't got the strap on to hold it closed, but he doesn't seem to mind. Not to mention that he won't give it back to me so I can add it. I'm planning on making myself a green or yellow one soon-ish. I will post that as well. If you have any questions let me know. I'd be happy to answer them. Plus I saved a lot of money making my own. And hey, isn't that what DIY is all about anyways??

13 November 2012

Harley Quinn Original costume


Ok, so you may have seen all the pictures in my slideshow that highlight my adventures in making my own Harley Quinn costume. So, I've been thinking about talking about how I made it and just doing an overview of the costume. I am going to do a few changed to the hood that I made. I believe that it could use a little bit of work. I have worn it to Dragon Con and took a lot of pictures. I'm not the best seamstress in the world, but I notice that the more I sew, the better I get! I hope that others notice it too!


First I found this pattern Kwik sew 3052

Kwik sew 3052
I used view A. Which I based on a 'mad love' picture of Harley with the joker where he was zipping down the front of her costume. I fell in love with that picture of them. So, I made the front zip costume. Nobody noticed the zipper in the front anyways, and it makes it easier to get out of also. The hardest part of making this was matching the lines in the middle. I had to cut out the pattern in black and then cut it where I wanted and then cut out the red to make sure it was the right length for me. so measure for your torso and I had to play with it a little bit. I advise basting this to make sure of the fit and cut with the black (or whichever you want to use. I had more of the black and it was cheaper to buy more.) I did not make a muslin with this fabric, because I didn't want to worry about the ease and the strech of the costume. Mine is a little bigger than skin tight. I also made the mask and some "shoes" that are more like spats really. I don't like wearing shoes but at Dragoncon, they make you wear them. I didn't ever go outside so it worked beautifully for me.
I made a circle for the white part to go over top the suit, and then cut out the half circles. My boyfriend wanted to help with this so he measured me and then drew on the fabric and cut it out and it was perfect. He just divided my circle by 5 so there would be the right amount of  "petals". I will take a picture of how this is done next time. I need to make a new one anyways, because someone spilled orange pop on mine and it stained.
this was me cutting out the arms and the extra pieces needed for the footies.


I had to carefully cut out the sections and cut the pattern in half to make it half black and half red.
I measured the piece in both colors and made a test piece in the red as a sort of muslin. I would really recommend this step.
Then of course is the sewing of all the pieces.

Which I was really excited about!!
most of the work is in the cutting and making sure the pieces fit together correctly.
 
I sadly no longer have this sewing machine, it was a good one for many years. sewing the middle together was difficiult with the seams streching and going all over the place. once this is set you add the zipper, I put it on the front but you could put it on the back to I suppose. Having it on the front makes it easier to put on and take off myself.

And here is a picture of me in the final jumpsuit.

I had fun making this and I am going to be working on some more Harley Quinn clothes soon.